
")
")
")


Apply and Iron your printing at home!
- Details
- Category: Utilità
- Hits: 2293
-

-

The following guide covers the kits Lextra (velvet), If you were looking for PVC plastic sets please refer to apposite procedure. Compared to the kit pvc what changes is that the manufacturer recommends a first pass with the numbers still in their plastic liner, and a second hand without the plastics such as fasteners.
The customization for the mesh is composed of:
- Transfer full name or letters to be placed in their transfer adhesive.
- Transfer complete number
For the procedure of application you need:
- A light white cloth (okay even a handkerchief) provided completely white. We recommend the use of handkerchiefs because they might ruin old. They're good two tissues overlapped to do some 'volume. The cloth will serve as protection for the kit, never put the iron directly on the product.
- An iron to use dry (remove the water container inside).
This Tutorial is composed by two Phasis:
- Positioning of printing on shirt.
- Effective printing.
Positioning of printing on shirt
The placement of the sets on the shirt is simply to understand where the name and the two numbers should be placed, and how to move between them.
Usually shirts use to have some references to calculate where is the center of the shirt (like collar or sewn under it, or logos) or some other sign that the manufacturer often makes visible precisely for this purpose. Failing this should put the jersey on a plane, measure the center, and maybe a bit marked 'tape adhesive for tissue.
To center the name and then evaluate where you find the center of the set and position relative to the baseline created earlier.
Then place the numbers.
In the case of a number only, it should be seen where is the center of the number, calculated in relation to the total height and its total width. The number 4, for example, can seem correctly placed hitting the upper part of the center . If, however, the tip moved to one side positioning was flawed.
To know how to position please refer to articles of Club teams.
2- Effective application.
As already mentioned, the difference with respect to the plastic is in the double pass. The kit Velvet more resistant, can in fact be passed through in order to have an application and a duration significantly better.
We find ourselves with customization correctly positioned on the shirt, then cover the set with the panno.Si recommended to initial pressing of iron throughout the set, so that the glue started to set and the position found previously is unaffected. To avoid the risk, keep the iron at a temperature not too hot, halfway between that used for cotton and wool.
Important: during the printing process the iron should not move, we have to simulate a professional heat press not taking care of a shirt or a jacket!
As for the temperature setting on the iron you need to take into account that we can not be precise as in the case of professional heat transfer. So that's why better start set it just slightly above the temperature of cotton. Then if you see it won't work increase graduately the temperature of the iron just a little bit per time.
The pression to do on the shirt with the iron, should be good evaluated. Don't put all your strength to do this or the iron will leave mark on shirt.
Another detail to consider is the temperature of removal. If the removal temperature is warm, means that the kit should be peeled off quickly after being pressed.
If the removal is cold, just let the shirt relax and get colder and then you try to peel off. Just ask this to our customer service as it may change set per set.
Another recommendation concerns the plastic protection, we recommend it even after you have completed the application, to retain, even for a couple of days. Sometimes even appear to apply, there may be need to repeat them to finish the job and in that case there would be useful.
Follows two pictures that explain better what told until now. The pictures are provided by a courtesy of angels44, user of Indonesian Forum Jersey Community.
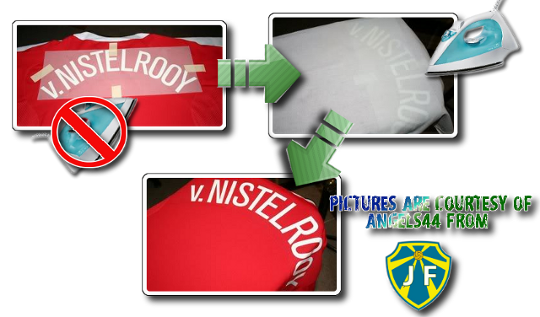
1- Positioning of name and pressing
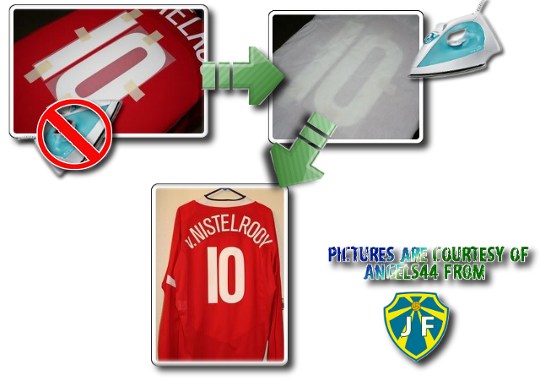
2- Same with number.
So in sum:
So in sum:
1. After placing the sets to make a first pass with the iron at temperatures generally midway between wool and cotton, pressed for 5-6 seconds on the desired area. Just a step to speed zones, just to make sure that the set starts to stick and move in stages.
2. So the pressing itself: keep the iron pressed for 12 seconds (unless otherwise specified in the schedule on the team) with discrete pressure. Obviously, the iron will not cover the complete surface of the transfer for which it is done for areas to cover everything necessary.
3. When the entire surface to be applied has been covered, then do a quick brush over the entire surface again, and groped to remove: This is because if the removal is hot.
4. If they start to pull the plastic note that the transfer have not been applied, allow to cool and try to cool.
5. If cold is not being applied, raising the minimum possible temperature on the iron and repeat the previous steps, so long as these do not apply.
6. When everything has been applied, allow to cool shirt, and check after about thirty minutes, if everything went the right way. If any piece is being dissected, put all the plastic in place and repeat the operation with a temperature slightly warmer.